2009.12/22
前回までで作ったチップ毎のcl0024画像(omomi1201odd.fits,omomi1201even.fits)を足し合わせて横長な一枚の画像(フォーマット5000*2848)をつくる。基本的には以前81枚を足し合わせたときと同様に
ダブってる天体の検出(チップ1とチップ2でxyxymatch) → geomap → geotranでチップ2をチップ1に合わせるように画像変換 → 2枚をimarith
でよい。
ただし!
imarithするときに単純に足し合わせてはダメで注意しなければならないことが二点ほどある
:・チップのzero点の違いの補正
前回見たようにチップ毎にzero点は異なるが、今回一枚の画像にするのだからzero点を1つに統一しないといけない。今チップ2について、zero点2をもつ元画像(chip2)をzero点1をもつように補正した画像(newchip2)に作り変えることを考える。chip2とnewchip2のどちらの画像でも(更にはchip1でも)、同じ天体を測光したら同じ等級を返さないといけないので
-2.5Log10(chip2)+zero2=-2.5Log10(newchip2)+zero1
→newchip2=chip2 * 10^{(zero1-zero2)/2.5}
・exposure mapによる重み付け
二枚を足し合わせる時にS/N比(t^0.5に比例)が同等の条件下で足し合わせたい。
単に(chip1+newchip2)/2だとchip1のS/N比悪い部分(右端)とchip2のS/N比良い部分が同等の重みで足されてしまう。→積分時間の長い部分からの寄与を大きくして足したい。
→それぞれのexposure map(exp1,exp2)で重み付けして足す
(exp1*chip1 + exp2*newchip2)/(exp1 + exp2)
☆其の一 chip1とchip2のだぶってる部分の位置合わせ
◎チップ1とチップ2のだぶってる部分から同一天体を検出
・チップ1とチップ2の重なってる部分を大まかに見積もる
cl> !ds9 &
cl> reset stdimage=imt4096
cl> display omomi1201odd.fits 1 zr- zs- z1=0 z2=200
cl> display omomi1201even.fits 2 zr- zs- z1=0 z2=200
↓
chip1:x=1700〜2150
chip2:x=420〜900
が重なってる(これは状況によって全然変わるのでこれをそのまま使うのではなく、しっかり毎回自分の目で確認した方がいい)
・それぞれのだぶってる部分だけ切り出した検出天体情報ファイル作成
前回omomi1201odd.fitsやomomi1201even.fitsに対してSExtractorをかけて天体検出を行っているので、その出力リストphoto1215odd.catとphoto1215even.catを使う
$ more photo1215odd.cat
で見ればわかるように5列目がx座標に対応するので、そこが上記の範囲内のデータだけ拾って新しいリストdaburi1222odd.catとdaburi1222even.catをつくる(中身はx,y,MAG_AUTO)
$ awk '$5>1700 && $5<2150 {print $5,$6,$4}' photo1215odd.cat > daburi1222odd.cat
$ awk '$5>420 && $5<900 {print $5,$6,$4}' photo1215even.cat > daburi1222even.cat
・xyxymatchをコケにくくするために天体数しぼる
daburi1222〜.catの3列目=Auto magの明るい10番目から80番目までの70個だけ引っ張ってきてnewdab1222〜.catとする
$ sort -k 3 -n daburi1222odd.cat | head -80 | tail -70 > newdab1222odd.cat
$ sort -k 3 -n daburi1222even.cat | head -80 | tail -70 > newdab1222even.cat
・xyxymatchでchip1とchip2でダブってる天体ペアのリストmatch1222.catつくる
cl> epar xyxy
I R A F
Image Reduction and Analysis Facility
PACKAGE = immatch
TASK = xyxymatch
input = newdab1222even.cat The input lists
referenc= newdab1222odd.cat The reference lists
output = match1222.cat The output matched coordinate lists #同じ天体だと判断された天体ペアのリスト#
toleranc= 3. The matching tolerance in pixels
(refpoin= ) Optional list of reference points
(xin = INDEF) X origin of input list
(yin = INDEF) Y origin of input list
(xmag = INDEF) X magnification required to match input to refer
(ymag = INDEF) Y magnification required to match input to refer
(xrotati= INDEF) X rotation required to match input to reference
(yrotati= INDEF) Y rotation required to match input to reference
(xref = INDEF) X origin of reference list
(yref = INDEF) Y origin of reference list
(xcolumn= 1) Input list column containing the x coordinate #注意!inputとreferenceそれぞれの(x,y)座標→それぞれの1、2列目でmatchingさせる#
(ycolumn= 2) Input list column containing the y coordinate
(xrcolum= 1) Reference list column containing the x coordinat
(yrcolum= 2) Reference list column containing the y coordinat
(separat= 9.) The minimum object separation
(matchin= triangles) The matching algorithm
(nmatch = 90) The maximum number of points for triangles algor #??#
(ratio = 10.) The maximum ratio of longest to shortest side of
(nreject= 50) The maximum number of rejection iterations
(xformat= %13.3f) The format of the output x coordinate
(yformat= %13.3f) The format of the output y coordinate
(interac= no) Interactive mode ?
(verbose= yes) Verbose mode ?
(icomman= ) The image display cursor
(mode = ql)
(:go)
自分はこれで上手くいった(54 reference coordinates matched)
◎chip2をchip1に位置合わせする変換規則つくる
cl> epar geomap
I R A F
Image Reduction and Analysis Facility
PACKAGE = immatch
TASK = geomap
input = match1222.cat The input coordinate file #chip1とchip2でダブってる天体ペアリスト#
database= database1222.cat The output database file #出力ファイル。変換法則がコレに入る#
xmin = 1. Minimum x reference coordinate value
xmax = 5000. Maximum x reference coordinate value #最終的に2枚足したときのフォーマット[1:5000,1:2848]に合わせとく#
ymin = 1. Minimum y reference coordinate value
ymax = 2848. Maximum y reference coordinate value
(transfo= ) The output transform records names
(results= ) The optional results summary files
(fitgeom= general) Fitting geometry
(functio= polynomial) Surface type
(xxorder= 2) Order of x fit in x
(xyorder= 2) Order of x fit in y
(xxterms= half) X fit cross terms type
(yxorder= 2) Order of y fit in x
(yyorder= 2) Order of y fit in y
(yxterms= half) Y fit cross terms type
(maxiter= 50) Maximum number of rejection iterations
(reject = 3.) Rejection limit in sigma units
(calctyp= real) Computation type
(verbose= yes) Print messages about progress of task ?
(interac= no) Fit transformation interactively ? #??#
(graphic= stdgraph) Default graphics device
(cursor = ) Graphics cursor
(mode = ql)
(:go)
これでチップ2画像をチップ1画像に位置合わせするための変換規則が作れたはず
◎omomi1201even.fitsをomomi1201odd.fitsに重なるように画像変換する
geotranでチップ1画像と重なるように変換されたチップ2画像new1222even.fits(フォーマットは5000*2848)をつくる
cl> epar geotran
I R A F
Image Reduction and Analysis Facility
PACKAGE = immatch
TASK = geotran
input = omomi1201even.fits Input data
output = new1222even.fits Output data
database= database1222.cat Name of GEOMAP database file
transfor= match1222.cat Names of coordinate transforms in database file
(geometr= geometric) Transformation type (linear,geometric)
(xin = INDEF) X origin of input frame in pixels
(yin = INDEF) Y origin of input frame in pixels
(xshift = INDEF) X origin shift in pixels
(yshift = INDEF) Y origin shift in pixels
(xout = INDEF) X origin of output frame in reference units
(yout = INDEF) Y origin of output frame in reference units
(xmag = INDEF) X scale of input picture in pixels per reference
(ymag = INDEF) Y scale of input picture in pixels per reference
(xrotati= INDEF) X axis rotation in degrees
(yrotati= INDEF) Y axis rotation in degrees
(xmin = INDEF) Minimum reference x value of output picture
(xmax = INDEF) Maximum reference x value of output picture
(ymin = INDEF) Minimum reference y value of output picture
(ymax = INDEF) Maximum reference y value of output picture
(xscale = 1.) X scale of output picture in reference units per
(yscale = 1.) Y scale of output picture in reference units per
(ncols = 5000) Number of columns in the output picture
(nlines = 2848) Number of lines in the output picture #outputファイルnew1222even.fitsのフォーマットは5000*2848にする#
(xsample= 1.) Coordinate surface sampling interval in x
(ysample= 1.) Coordinate surface sampling interval in y
(interpo= linear) Interpolant
(boundar= constant) Boundary extension (nearest,constant,reflect,wra
(constan= 0.) Constant boundary extension #余白だとはっきりさせるために-1000000とかでも良いのだがそうすると後々其の二でやっかいなことも起きるのでとりあえず0にしとく#
(fluxcon= yes) Preserve image flux?
(nxblock= 512) X dimension of working block size in pixels
(nyblock= 512) Y dimension of working block size in pixels
(verbose= yes) Print messages about the progress of the task
(mode = ql)
(:go)
これで位置合わせされたチップ2画像new1222even.fitsの完成
◎chip1のフォーマットを横に広げる。chip2、new1222even.fitsの5000*2848に合わせる一例
最終的につくる一枚の画像はフォーマットを5000*2848にする予定なのでチップ1のフォーマットもそれに直す。
mkpattというタスクを使うためにartdataパッケージに入っとく
cl> artdata
ar> epar mkpatt #mkpattern:新しいファイルをつくるためのタスク#
I R A F
Image Reduction and Analysis Facility
PACKAGE = artdata
TASK = mkpattern
input = new1222odd.fits Images to create or modify #これから作りたいフォーマット5000*2848のファイル名を入れとく#
(output = ) Output images
(pattern= constant) Pattern #constantにしとくととりあえず全pixelのvalueがv1になる(今は後で余白が0になるように0)#
(option = replace) Editing option
(v1 = 0.) Pattern value
(v2 = 1.) Pattern value
(size = 1) Pattern size
IF NEW IMAGE
(title = ) Image title
(pixtype= real) Pixel datatype
(ndim = 2) Number of dimensions
(ncols = 5000) Number of columns
(nlines = 2848) Number of lines #変更後のフォーマット#
(n3 = 1) Number of pixels in 3rd dimension
(n4 = 1) Number of pixels in 4th dimension
(n5 = 1) Number of pixels in 5th dimension
(n6 = 1) Number of pixels in 6th dimension
(n7 = 1) Number of pixels in 7th dimension
(header = omomi1201odd.fits) Image or header keyword file #ヘッダーなくてもいいかもしれないが一応元のファイルのヘッダー与えとく#
(mode = ql)
(:go)
(→これでできたnew1222odd.fitsはフォーマットが変わっただけで中身はない。てか全pixelのvalueが0)
・後でexposure mapもいじるのでそのときのためにnew1222odd.fitsをコピーしとく
ar> imcopy new1222odd.fits exp1222odd.fits
・new1222odd.fitsの中身としてomomi1201odd.fitsを与えてやる。[1:2848,1:2848]だけ
ar> imcopy omomi1201odd.fits new1222odd.fits[1:2848,1:2848]
◎2枚を表示させて位置合わせされたかチェック!
ar> !ds9 &
ar> reset stdimage=imt8192 #5000*2848が表示されるように#
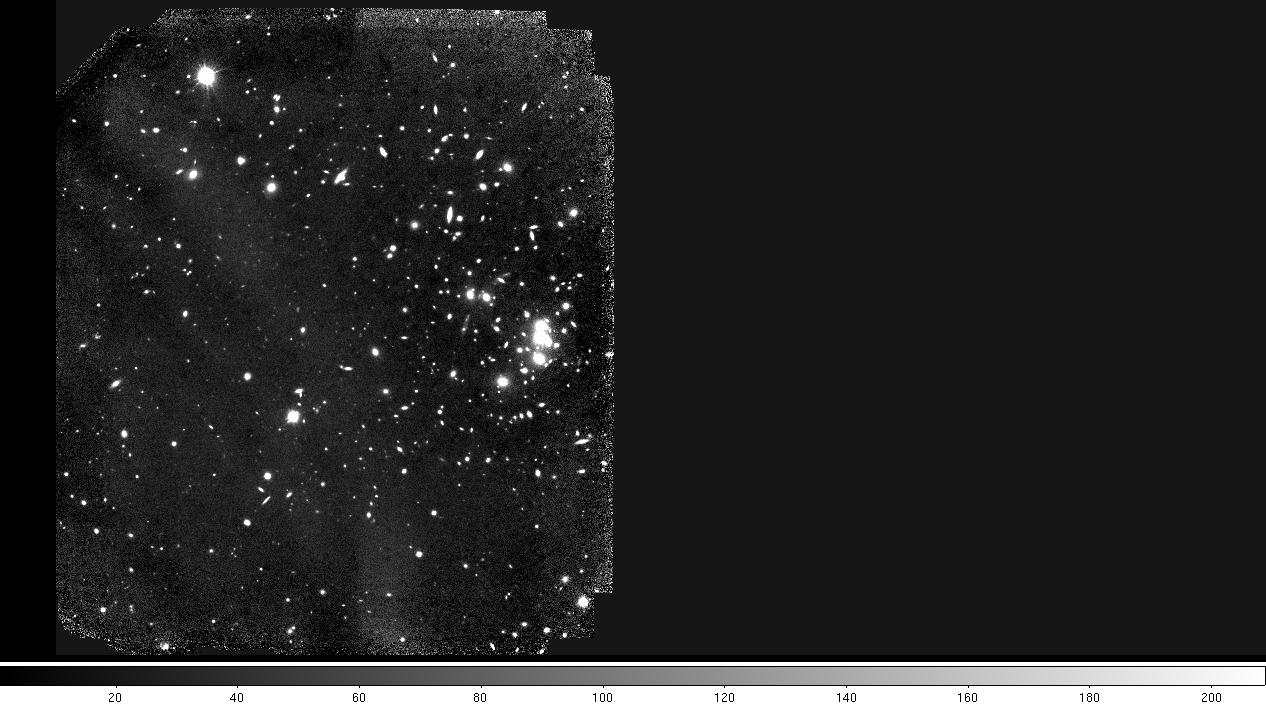
ar> display new1222odd.fits 1 zr- zs- z1=-20 z2=200 →こんなの
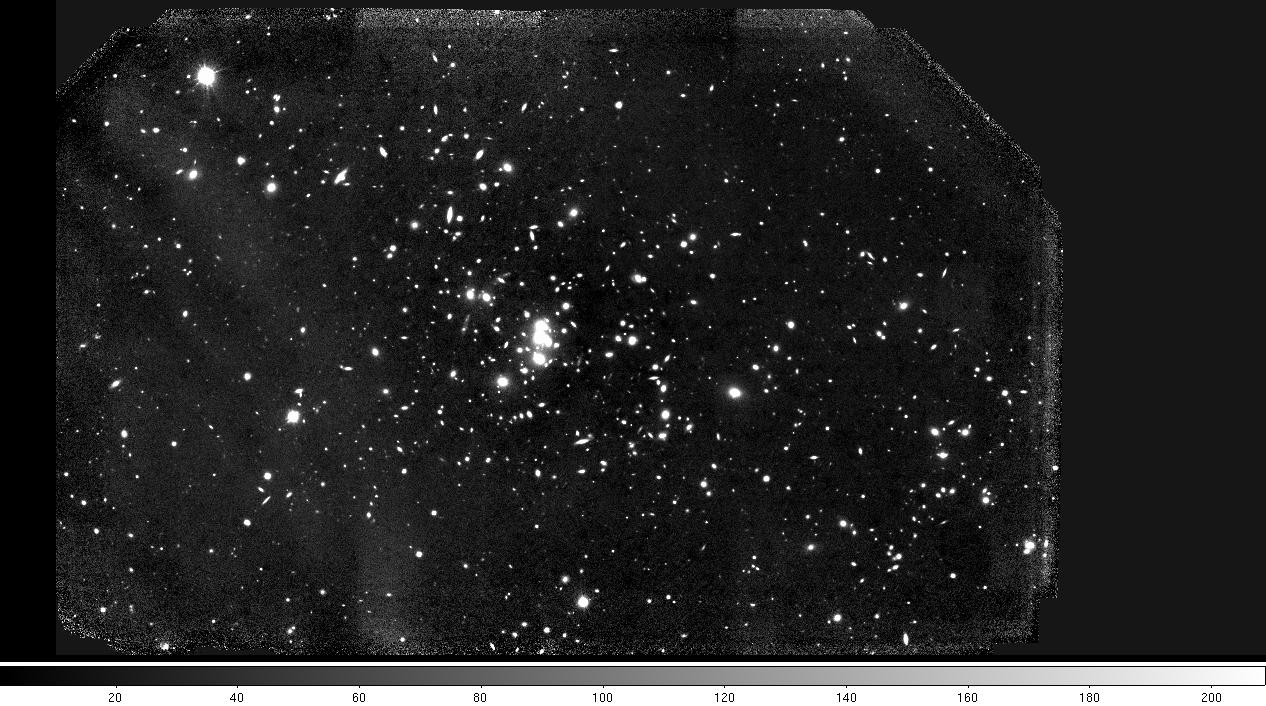
ar> display new1222even.fits 2 zr- zs- z1=-20 z2=200 →こんなの
Tab連打すればちゃんと位置合わせされたことがわかるはず
☆其の二 位置合わせされた2枚を重ねるための準備、確認作業
new1222odd.fitsとnew1222even.fitsは位置合わせはされてるが、zero点が違うのでこのまま足し合わせても意味ない。1枚のうち左側と右側で感度が異なる画像になってしまう。具体的な補正は其の三で行い、ここではその時に必要になるnew1222〜.fitsのexposure mapを準備しとく。
またそれを使ってnew1222〜.fitsがちゃんと作られているかどうかの確認作業も行う。こうした確認作業がとても大事。
↓
◎チップ1,2のexposure mapを具体的につくる
・チップ1
チップ1については先にフォーマットだけ整えたexp1222odd.fitsをつくってあるのでこれの[1:2848,1:2848]の部分にexpomomi1201odd.fitsをコピーすればいいだけ
ar> imcopy expomomi1201odd.fits exp1222odd.fits[1:2848,1:2848]
・expomomi1201even.fitsから位置合わせ、フォーマット拡張したchip2のexposure mapをつくる
new1222even.fitsを作ったときと同じ変換をgeotranで行えばいい
ar> epar geotran
I R A F
Image Reduction and Analysis Facility
PACKAGE = immatch
TASK = geotran
input = expomomi1201even.fits Input data
output = exp1222even.fits Output data
database= database1222.cat Name of GEOMAP database file
transfor= match1222.cat Names of coordinate transforms in database file
(geometr= geometric) Transformation type (linear,geometric)
(xin = INDEF) X origin of input frame in pixels
(yin = INDEF) Y origin of input frame in pixels
(xshift = INDEF) X origin shift in pixels
(yshift = INDEF) Y origin shift in pixels
(xout = INDEF) X origin of output frame in reference units
(yout = INDEF) Y origin of output frame in reference units
(xmag = INDEF) X scale of input picture in pixels per reference
(ymag = INDEF) Y scale of input picture in pixels per reference
(xrotati= INDEF) X axis rotation in degrees
(yrotati= INDEF) Y axis rotation in degrees
(xmin = INDEF) Minimum reference x value of output picture
(xmax = INDEF) Maximum reference x value of output picture
(ymin = INDEF) Minimum reference y value of output picture
(ymax = INDEF) Maximum reference y value of output picture
(xscale = 1.) X scale of output picture in reference units per
(yscale = 1.) Y scale of output picture in reference units per
(ncols = 5000) Number of columns in the output picture
(nlines = 2848) Number of lines in the output picture #outputファイルnew1222even.fitsのフォーマットは5000*2848にする#
(xsample= 1.) Coordinate surface sampling interval in x
(ysample= 1.) Coordinate surface sampling interval in y
(interpo= linear) Interpolant
(boundar= constant) Boundary extension (nearest,constant,reflect,wra
(constan= 0.) Constant boundary extension #余白だとはっきりさせるために-1000000とかでも良いのだがそうすると後々其の二でやっかいなことも起きるのでとりあえず0にしとく#
(fluxcon= yes) Preserve image flux?
(nxblock= 512) X dimension of working block size in pixels
(nyblock= 512) Y dimension of working block size in pixels
(verbose= yes) Print messages about the progress of the task
(mode = ql)
(:go)
・それぞれのexposure mapを見てみる
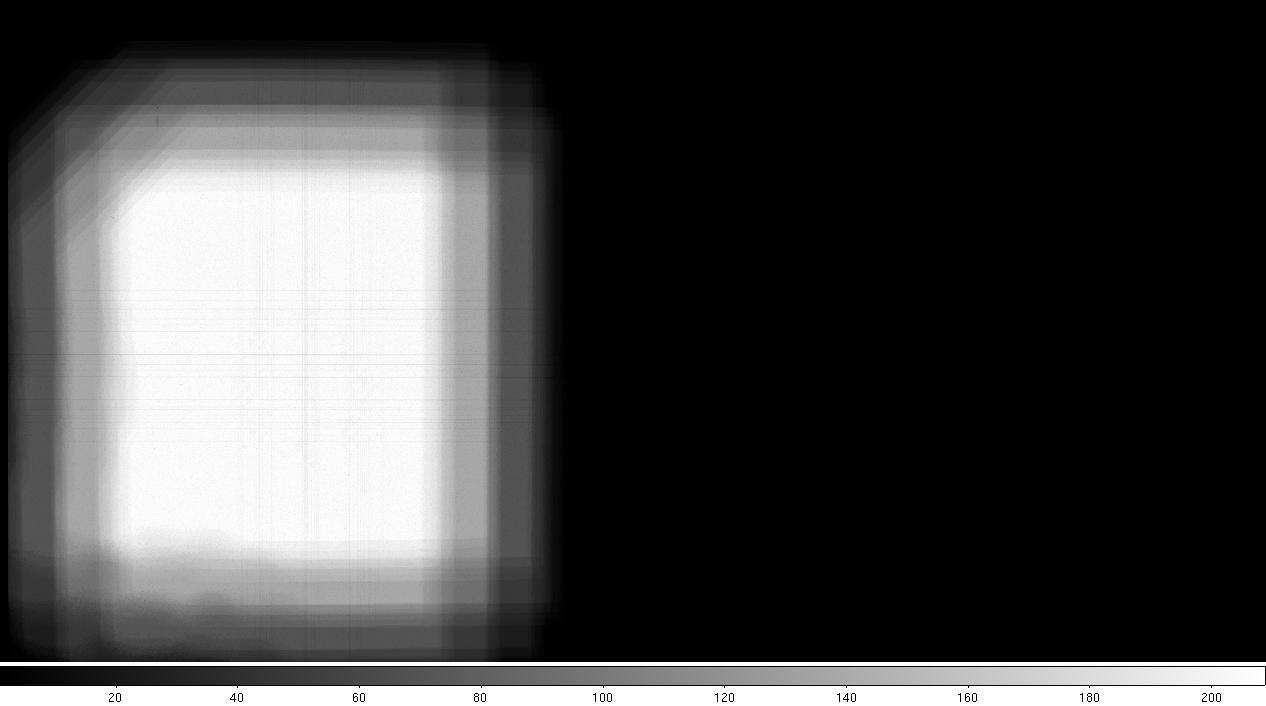
ar> display exp1222odd.fits 3 →こんなの
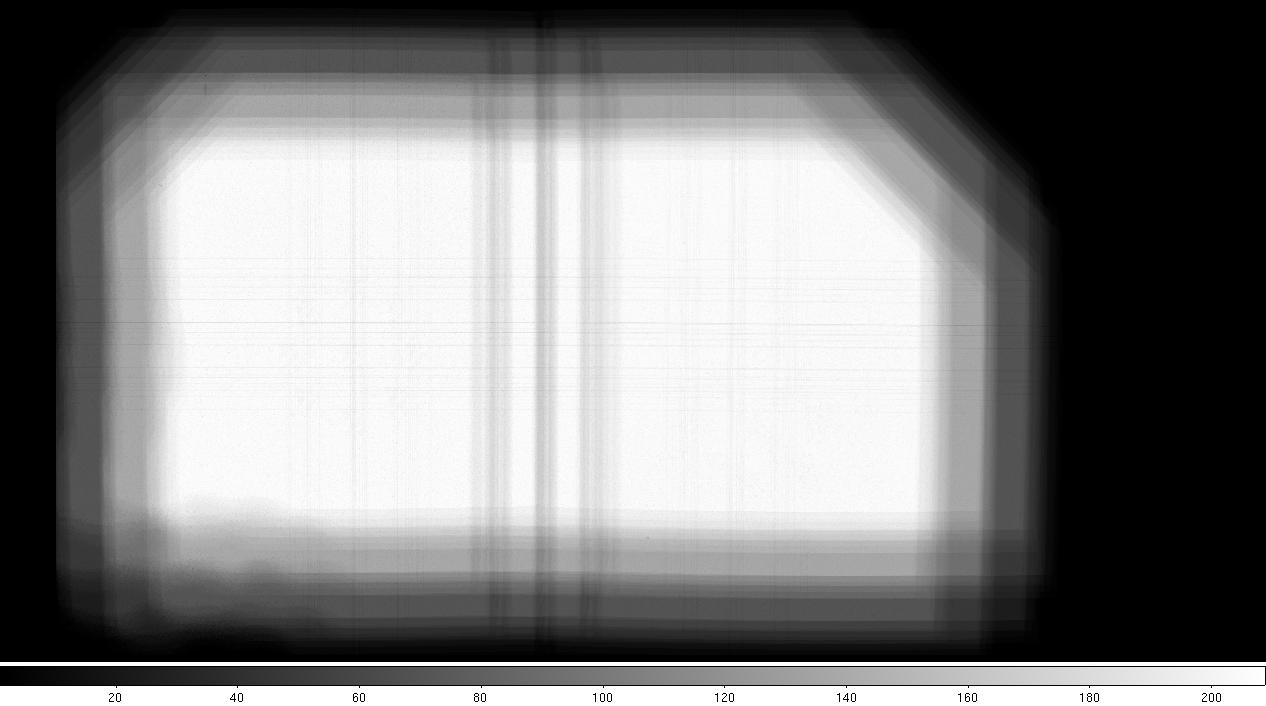
ar> display exp1222even.fits 4 →こんなの
◎確認作業。chip1に天体検出かける。ただしwmode用いて測光はチップ2用いる。
new1222odd.fitsとnew1222even.fitsがちゃんと出来ているか確認してから其の三に進みたい。
そのためにSExtractorのWmodeというのを使って、チップ1で天体検出チップ2で測光をした結果の天体等級と、チップ1で測光もした結果の天体等級が大体等しくなっていることを確認していく。
注:SExtracto-Wmode・・・sex チップ1 チップ2 -c 〜.sex とすることでチップ1で天体検出を行いその検出された場所における測光はチップ2で行ってくれる、というもの
もしチップ1で天体あるところにチップ2で天体なければmagとしてイカレた値(99とか)を返す。
・チップ1とチップ2のだぶった部分だけを測光する(chip1で天体検出、chip2で測光)
以下のようなパラメータファイルphoto1222daburi.sexをつくる。出力paramファイルは以前のphoto1215.paramを使い回す。
→photo1222daburi.sex
実行
$ sex new1222odd.fits new1222even.fits -c photo1222daburi.sex
ちゃんとやりたいことができているかどうか確認
ちゃんとできていればだぶっていない部分はMAGがイカレた値になってるはずなので、結果ファイル1222oddphotoevenからMAG_AUTOが普通の値(10<$4<24)の行だけを切り取ってリスト化し、その座標($5,$6)をgnuplotでプロットさせる。ちゃんとできていればだぶっている部分(x=1700~2100くらい)にしかプロットされないはず。
$ awk '$4<24 && $4>10{print $5,$6,$4}' 1222oddphotoeven.cat > dabcheck1222.cat
$ gnuplot
gnuplot> plot [0:5000][]"dabcheck1222.cat" u 1:2 →こんなの(epsファイル)
大体よさそうなことを確認して先に進む
・検出・測光ともにチップ1で行う
パラメータファイルは以下のようなものをつくる
→photo1222odd.sex
実行(後で1222oddphotoeven.catと並べたいのでこちらもWmode使う)
$ sex new1222odd.fits new1222odd.fits -c photo1222odd.sex
・検出・測光ともにチップ2で行う
パラメータファイルは以下のようなものをつくる
→photo1222even.sex
実行
$ sex new1222even.fits new1222even.fits -c photo1222even.sex
・確認作業
以上で4つのファイル=1222oddphotoeven.cat(天体検出はチップ1、測光はチップ2の検出リスト)
1222oddphotoodd.cat(検出も測光もチップ1のリスト)
1222evenphotoeven.cat(検出も測光もチップ2のリスト)
dabcheck1222.cat(1222oddphotoeven.catから等級がまともな値のものだけ選び出して作ったリスト=だぶった部分のみの天体リスト)
ができたのでこれらを用いて、new1222odd.fitsとnew1222even.fitsがちゃんと出来てることを確認していく
dabcheck1222.catがちゃんとだぶった部分の天体を反映してるか?
→$ gnuplot
gnuplot> plot [0:5000][] "1222oddphotoodd.cat" u 5:6 , "1222evenphotoeven.cat" u 5:6 , "dabcheck1222.cat" u 1:2 →こんなの(epsファイル)
・・・OK!(だぶってる範囲が大体1700<x<2200ということも確認できた)
だぶってる天体に対しては1222oddphotoeven.catと1222oddphotoodd.catでちゃんと同じ等級を返しているか?
→$ paste 1222oddphotoeven.cat 1222oddphotoodd.cat > paste1222.cat (pasteは並べて表示させるコマンド)
まずは目でおおまかに確認
$ more paste1222.cat
# 1 NUMBER Running object number
# 1 NUMBER Running object number
# 2 MAG_ISO Isophotal magnitude [mag]
# 2 MAG_ISO Isophotal magnitude [mag]
# 3 MAG_APER Fixed aperture magnitude vector [mag]
# 3 MAG_APER Fixed aperture magnitude vector [mag]
# 4 MAG_AUTO Kron-like elliptical aperture magnitude [mag]
# 4 MAG_AUTO Kron-like elliptical aperture magnitude [mag]
# 5 X_IMAGE Object position along x [pixel]
# 5 X_IMAGE Object position along x [pixel]
# 6 Y_IMAGE Object position along y [pixel]
# 6 Y_IMAGE Object position along y [pixel]
# 7 FWHM_IMAGE FWHM assuming a gaussian core [pixel]
# 7 FWHM_IMAGE FWHM assuming a gaussian core [pixel]
# 8 FLAGS Extraction flags
# 8 FLAGS Extraction flags
1 67.3213 68.2250 65.2174 981.539 55.890 0.00 0
1 20.0790 21.2245 19.8157 981.539 55.890 10.17 0
2 93.4985 97.2976 92.7752 437.311 35.723 0.00 0
2 16.4684 18.2398 16.2857 437.311 35.723 7.65 0
3 27.5292 30.5403 27.3248 1745.851 35.928 0.00 16
3 17.0851 18.9664 16.9753 1745.851 35.928 15.41 16
4 99.0000 99.0000 99.0000 1843.630 22.587 0.00 0
4 17.7368 19.0770 17.6257 1843.630 22.587 9.22 0
--続ける--(1%)
大体MAG_AUTOが同じっぽいことを確認したら、もっと統計的に見てやる。
paste1222.catからMAG_AUTO($12),1222oddphotoeven.catのMAG_AUTOー1222oddphotoodd.catのMAG_AUTO($4-$12),x($13),y($14)を抜き出してリスト化
$ awk '$1>0 {print $12,$4-$12,$13,$14}' paste1222.cat > 1222magcheck1.cat
さらにだぶっている部分(1700<x<2200)だけを選択してリスト化
$ awk '$1>0 && $13>1700 && $13<2200{print $12,$4-$12,$13,$14}' paste1222.cat > 1222magcheck2.cat
$ gnuplot
横軸に等級、縦軸に等級の差分をとってプロット
gnuplot> plot '1222magcheck1.cat' u 1:2 , '1222magcheck2.cat' u 1:2 →こんなの(epsファイル)
gnuplot> plot [12:23] [-1:1] '1222magcheck2.cat' u 1:2 , -0.03 →こんなの(epsファイル)
・・・大体OK!(明るい天体ほどchip2とchip1の測光値の差が小さく、暗くなるにつれて測光値の差が大きいことが確認できた)
こうした確認作業を経て初めて、安心して次のステップに進める
☆其の三 二枚のファイルnew1222odd.fits,new1222even.fits(exp1222odd.fits,exp1222even.fits)を具体的に足し合わせて一枚の画像にする!
◎zero点をチップ1のものに合わせた補正チップ2画像を作る
・chip1とchip2のzero点の違いを補正→補正チップ2=チップ2*10^(zero1-zero2/2.5)
zero1=29.785,zero2=30.041を用いて計算した結果
10^((zero1-zero2)/2.5)=0.7900
→補正チップ2は「new1222even+.fits=new1222even.fits * 0.79」とすれば良いだけ
ar> imarith new1222even.fits * 0.79 new1222even+.fits
・心配なのでチェック
以下のようにchip1で天体検出、zero点補正したchip2で測光するためのsexファイルつくる
→1222check1.sex
実行
$ sex new1222odd.fits new1222even+.fits -c 1222check1.sex
測光をchip2でやったものとnewchip2(zero点補正済)でやったものとを比べる
[ken@d21-012-250 practice]$ paste 1222oddphotoeven.cat 1222check1.cat | more
→全く同じ等級を返すはず!→new1222even+.fitsは確かにzero点がchip1とそろうように補正された!
◎zero点補正したnew1222even+.fitsとnew1222odd.fitsをexposure mapで重み付けして足し合わせる
要は
(new1222odd.fits*exp1222odd.fits+new1222even+.fits*exp1222even.fits)/(exp1222odd.fits+exp1222even.fits)
がしたいだけ。imarithだと一度に出来る演算が一つだけなので、bokeを多用する
↓
↓
ar> imarith new1222odd.fits * exp1222odd.fits boke1.fits
ar> imarith new1222even+.fits * exp1222even.fits boke2.fits
ar> imarith boke1.fits + boke2.fits boke3.fits
ar> imarith exp1222odd.fits + exp1222even.fits exp1222.fits #exposure mapだけはあとで使えそうなのでちゃんとした名前つけとく#
ar> imarith boke3.fits / exp1222.fits perfect1222.fits
これで足し合わせできた画像perfect1222.fitsが出来たはずなので確認してみる。
ar> display perfect1222.fits 1 zr- zs- z1=-20 z2=200 →こんなの
ar> display exp1222.fits 2 →こんなの
→良さげなのが出来てる!!!
これで生データ160枚からflat割り、sky引き、distortion補正、chip毎に81枚足し合わせ(位置合わせ,maskがけ,フレーム毎に1/σ^2で重みづけ)、chip1とchip2の足し合わせ(chip2のzero点補正,exp mapでの重みづけ)が済んだ画像の出来上がり→一次処理の完了!
次回以降はこの出来上がった画像を使ってサイエンスしていく